

build 7bbbddf7 | content blog-content@c8490fa · 338 posts | profiles 20 · corpus 267 | 0 skipped | | format
apiVersion: soultec.ch/v1kind: Postmetadata: name: how-to-install-vcenter-without-dns locale: en labels: author: marco-mattei series: how-to capability/virtualization: 1.37 capability/network: 2.16 vendor/vmware: 0.88 annotations: source: blog-content/posts/en/how-to-install-vcenter-without-dns.md route: /en/insights/how-to-install-vcenter-without-dns/ schema: /nerd/schema/posts.json markdown: /en/insights/how-to-install-vcenter-without-dns.mdspec: title: Install vCenter without DNS date: 2023-06-19 author: marco-mattei locale: en summary: >- A lot of people believe you cannot install vCenter without a DNS server in the environment. Not quite. It is not ideal, but it works. capabilities: [virtualization, network] vendors: [vmware] series: how-to hero: /blog-assets/how-to-install-vcenter-without-dns/hero.webp migrated: 2026-08-24 translationReviewed: false draft: false sections: - body: | A lot of people believe you cannot install vCenter without a DNS server in the environment. Not quite. Installing without DNS is not ideal, but it works. You lose the ability to update vCenter directly and lookup queries will not work, which is what you would expect here. If you can, install vCenter with a DNS server. But maybe you have a small lab or an isolated cluster you want to manage with vCenter and no DNS server. Or you just want to try a small vCenter in an isolated environment. I did, and I found a few tricks worth following: - heading:

Installing vCenter

body: | The vCenter installation itself runs normally until you reach step 9, configuring the network settings. Leave the FQDN and the DNS entry empty. ![step 9, vCenter installation](/blog-assets/how-to-install-vcenter-without-dns/01.webp) The installation continues until you reach stage 2. For some reason the "next" button in the second step, where you set NTP and SSH, is greyed out no matter what you configure: ![stage 2, vCenter installation](/blog-assets/how-to-install-vcenter-without-dns/02.webp) The fix is to go straight to the vCenter's IP on port 5480. In my case that would be [https://10.24.0.33:5480](https://10.24.0.33:5480/). From there you can carry on. The next window asks for the network information. You will not get past it without a system name and a DNS server, because both are mandatory fields. The fix: enter "localhost" as the system name and "127.0.0.1" as the DNS server. That way vCenter can resolve itself, alongside the entry in the hosts file. ![stage 2, vCenter installation](/blog-assets/how-to-install-vcenter-without-dns/03.webp)After that the installation runs through and your vCenter is installed and started. You cannot add hosts by DNS name, of course, since everything has to go by IP. But if you later decide to run a DNS server after all, you add it in the VAMI (port 5480) and change vCenter's hostname there. How to install DNS in a homelab is described [here](https://soultec.ch/homelab-setting-up-a-small-dns-server-for-your-homelab/).status: corpus: 267 alsoLike: - {ref: solutions/vmware/vmware-cloud-foundation/addon/avi-load-balancing, score: 1.00} - {ref: posts/vmware-software-defined-wan, score: 0.73} - {ref: experts/marco-betschart, score: 0.73}
{ "apiVersion": "soultec.ch/v1", "kind": "Post", "metadata": { "name": "how-to-install-vcenter-without-dns", "locale": "en", "labels": { "author": "marco-mattei", "series": "how-to", "capability/virtualization": "1.37", "capability/network": "2.16", "vendor/vmware": "0.88" }, "annotations": { "source": "blog-content/posts/en/how-to-install-vcenter-without-dns.md", "route": "/en/insights/how-to-install-vcenter-without-dns/", "schema": "/nerd/schema/posts.json", "markdown": "/en/insights/how-to-install-vcenter-without-dns.md" } }, "spec": { "title": "Install vCenter without DNS", "date": "2023-06-19", "author": "marco-mattei", "locale": "en", "summary": "A lot of people believe you cannot install vCenter without a DNS server in the environment. Not quite. It is not ideal, but it works.", "capabilities": [ "virtualization", "network" ], "vendors": [ "vmware" ], "series": "how-to", "hero": "/blog-assets/how-to-install-vcenter-without-dns/hero.webp", "migrated": "2026-08-24", "translationReviewed": false, "draft": false }, "sections": [ { "body": "A lot of people believe you cannot install vCenter without a DNS server in the environment. Not quite. Installing without DNS is not ideal, but it works. You lose the ability to update vCenter directly and lookup queries will not work, which is what you would expect here.\n\nIf you can, install vCenter with a DNS server. But maybe you have a small lab or an isolated cluster you want to manage with vCenter and no DNS server. Or you just want to try a small vCenter in an isolated environment. I did, and I found a few tricks worth following:" }, { "heading": "

Installing vCenter

",
"body": "The vCenter installation itself runs normally until you reach step 9, configuring the network settings.\n\nLeave the FQDN and the DNS entry empty.\n\n![step 9, vCenter installation](/blog-assets/how-to-install-vcenter-without-dns/01.webp)\n\nThe installation continues until you reach stage 2. For some reason the \"next\" button in the second step, where you set NTP and SSH, is greyed out no matter what you configure:\n\n![stage 2, vCenter installation](/blog-assets/how-to-install-vcenter-without-dns/02.webp)\n\nThe fix is to go straight to the vCenter's IP on port 5480. In my case that would be [https://10.24.0.33:5480](https://10.24.0.33:5480/). From there you can carry on.\n\nThe next window asks for the network information. You will not get past it without a system name and a DNS server, because both are mandatory fields. The fix: enter \"localhost\" as the system name and \"127.0.0.1\" as the DNS server. That way vCenter can resolve itself, alongside the entry in the hosts file.\n\n![stage 2, vCenter installation](/blog-assets/how-to-install-vcenter-without-dns/03.webp)After that the installation runs through and your vCenter is installed and started. You cannot add hosts by DNS name, of course, since everything has to go by IP. But if you later decide to run a DNS server after all, you add it in the VAMI (port 5480) and change vCenter's hostname there.\n\nHow to install DNS in a homelab is described [here](https://soultec.ch/homelab-setting-up-a-small-dns-server-for-your-homelab/)." } ], "status": { "corpus": 267, "alsoLike": [ { "ref": "solutions/vmware/vmware-cloud-foundation/addon/avi-load-balancing", "score": "1.00" }, { "ref": "posts/vmware-software-defined-wan", "score": "0.73" }, { "ref": "experts/marco-betschart", "score": "0.73" } ] }}
apiVersion = "soultec.ch/v1"kind = "Post"[metadata]name = "how-to-install-vcenter-without-dns"locale = "en"[metadata.labels]author = "marco-mattei"series = "how-to""capability/virtualization" = "1.37""capability/network" = "2.16""vendor/vmware" = "0.88"[metadata.annotations]source = "blog-content/posts/en/how-to-install-vcenter-without-dns.md"route = "/en/insights/how-to-install-vcenter-without-dns/"schema = "/nerd/schema/posts.json"markdown = "/en/insights/how-to-install-vcenter-without-dns.md"[spec]title = "Install vCenter without DNS"date = 2023-06-19author = "marco-mattei"locale = "en"summary = "A lot of people believe you cannot install vCenter without a DNS server in the environment. Not quite. It is not ideal, but it works."capabilities = ["virtualization", "network"]vendors = ["vmware"]series = "how-to"hero = "/blog-assets/how-to-install-vcenter-without-dns/hero.webp"migrated = 2026-08-24translationReviewed = falsedraft = false[[sections]]body = '''A lot of people believe you cannot install vCenter without a DNS server in the environment. Not quite. Installing without DNS is not ideal, but it works. You lose the ability to update vCenter directly and lookup queries will not work, which is what you would expect here.If you can, install vCenter with a DNS server. But maybe you have a small lab or an isolated cluster you want to manage with vCenter and no DNS server. Or you just want to try a small vCenter in an isolated environment. I did, and I found a few tricks worth following:'''[[sections]]heading = "

Installing vCenter

"
body = '''The vCenter installation itself runs normally until you reach step 9, configuring the network settings.Leave the FQDN and the DNS entry empty.![step 9, vCenter installation](/blog-assets/how-to-install-vcenter-without-dns/01.webp)The installation continues until you reach stage 2. For some reason the "next" button in the second step, where you set NTP and SSH, is greyed out no matter what you configure:![stage 2, vCenter installation](/blog-assets/how-to-install-vcenter-without-dns/02.webp)The fix is to go straight to the vCenter's IP on port 5480. In my case that would be [https://10.24.0.33:5480](https://10.24.0.33:5480/). From there you can carry on.The next window asks for the network information. You will not get past it without a system name and a DNS server, because both are mandatory fields. The fix: enter "localhost" as the system name and "127.0.0.1" as the DNS server. That way vCenter can resolve itself, alongside the entry in the hosts file.![stage 2, vCenter installation](/blog-assets/how-to-install-vcenter-without-dns/03.webp)After that the installation runs through and your vCenter is installed and started. You cannot add hosts by DNS name, of course, since everything has to go by IP. But if you later decide to run a DNS server after all, you add it in the VAMI (port 5480) and change vCenter's hostname there.How to install DNS in a homelab is described [here](https://soultec.ch/homelab-setting-up-a-small-dns-server-for-your-homelab/).'''[status]corpus = 267[[status.alsoLike]]ref = "solutions/vmware/vmware-cloud-foundation/addon/avi-load-balancing"score = "1.00"[[status.alsoLike]]ref = "posts/vmware-software-defined-wan"score = "0.73"[[status.alsoLike]]ref = "experts/marco-betschart"score = "0.73"
<?xml version="1.0" encoding="UTF-8"?><manifest kind="Post"> <apiVersion>soultec.ch/v1</apiVersion> <metadata> <name>how-to-install-vcenter-without-dns</name> <locale>en</locale> <labels> <author>marco-mattei</author> <series>how-to</series> <entry key="capability/virtualization">1.37</entry> <entry key="capability/network">2.16</entry> <entry key="vendor/vmware">0.88</entry> </labels> <annotations> <source>blog-content/posts/en/how-to-install-vcenter-without-dns.md</source> <route>/en/insights/how-to-install-vcenter-without-dns/</route> <schema>/nerd/schema/posts.json</schema> <markdown>/en/insights/how-to-install-vcenter-without-dns.md</markdown> </annotations> </metadata> <spec> <title>Install vCenter without DNS</title> <date>2023-06-19</date> <author>marco-mattei</author> <locale>en</locale> <summary>A lot of people believe you cannot install vCenter without a DNS server in the environment. Not quite. It is not ideal, but it works.</summary> <capabilities> <item>virtualization</item> <item>network</item> </capabilities> <vendors> <item>vmware</item> </vendors> <series>how-to</series> <hero>/blog-assets/how-to-install-vcenter-without-dns/hero.webp</hero> <migrated>2026-08-24</migrated> <translationReviewed>false</translationReviewed> <draft>false</draft> </spec> <sections> <section> <body>A lot of people believe you cannot install vCenter without a DNS server in the environment. Not quite. Installing without DNS is not ideal, but it works. You lose the ability to update vCenter directly and lookup queries will not work, which is what you would expect here.If you can, install vCenter with a DNS server. But maybe you have a small lab or an isolated cluster you want to manage with vCenter and no DNS server. Or you just want to try a small vCenter in an isolated environment. I did, and I found a few tricks worth following: </body> </section> <section> <heading>

Installing vCenter

</heading>
<body>The vCenter installation itself runs normally until you reach step 9, configuring the network settings.Leave the FQDN and the DNS entry empty.![step 9, vCenter installation](/blog-assets/how-to-install-vcenter-without-dns/01.webp)The installation continues until you reach stage 2. For some reason the "next" button in the second step, where you set NTP and SSH, is greyed out no matter what you configure:![stage 2, vCenter installation](/blog-assets/how-to-install-vcenter-without-dns/02.webp)The fix is to go straight to the vCenter's IP on port 5480. In my case that would be [https://10.24.0.33:5480](https://10.24.0.33:5480/). From there you can carry on.The next window asks for the network information. You will not get past it without a system name and a DNS server, because both are mandatory fields. The fix: enter "localhost" as the system name and "127.0.0.1" as the DNS server. That way vCenter can resolve itself, alongside the entry in the hosts file.![stage 2, vCenter installation](/blog-assets/how-to-install-vcenter-without-dns/03.webp)After that the installation runs through and your vCenter is installed and started. You cannot add hosts by DNS name, of course, since everything has to go by IP. But if you later decide to run a DNS server after all, you add it in the VAMI (port 5480) and change vCenter's hostname there.How to install DNS in a homelab is described [here](https://soultec.ch/homelab-setting-up-a-small-dns-server-for-your-homelab/). </body> </section> </sections> <status> <corpus>267</corpus> <alsoLike> <item> <ref>solutions/vmware/vmware-cloud-foundation/addon/avi-load-balancing</ref> <score>1.00</score> </item> <item> <ref>posts/vmware-software-defined-wan</ref> <score>0.73</score> </item> <item> <ref>experts/marco-betschart</ref> <score>0.73</score> </item> </alsoLike> </status></manifest>
How-To · 2023-06-19

Install vCenter without DNS

A lot of people believe you cannot install vCenter without a DNS server in the environment. Not quite. It is not ideal, but it works.

2023-06-19Date
Marco MatteiAuthor
2Min read
Topics Virtualization 1.37 Network 2.16
Vendors VMware 0.88

A lot of people believe you cannot install vCenter without a DNS server in the environment. Not quite. Installing without DNS is not ideal, but it works. You lose the ability to update vCenter directly and lookup queries will not work, which is what you would expect here.

If you can, install vCenter with a DNS server. But maybe you have a small lab or an isolated cluster you want to manage with vCenter and no DNS server. Or you just want to try a small vCenter in an isolated environment. I did, and I found a few tricks worth following:

Installing vCenter

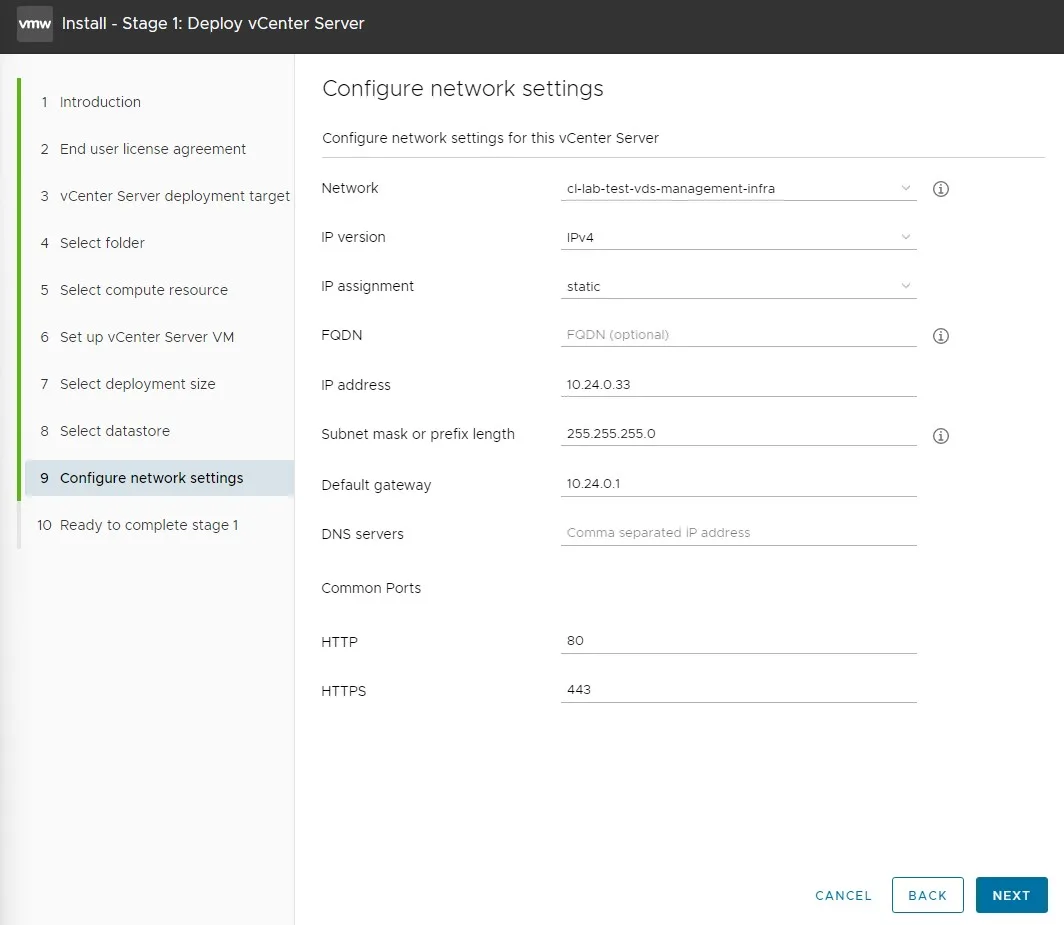
The vCenter installation itself runs normally until you reach step 9, configuring the network settings.

Leave the FQDN and the DNS entry empty.

step 9, vCenter installation

The installation continues until you reach stage 2. For some reason the “next” button in the second step, where you set NTP and SSH, is greyed out no matter what you configure:
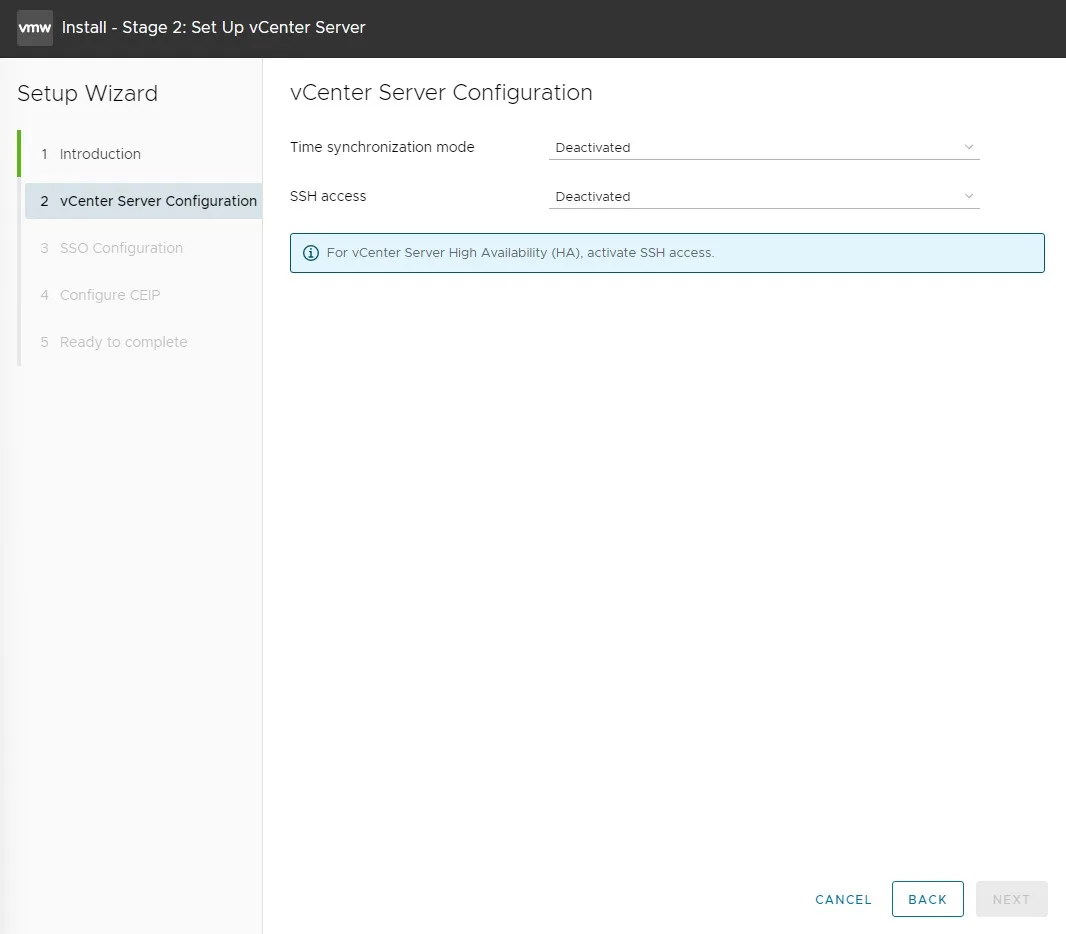
stage 2, vCenter installation

The fix is to go straight to the vCenter’s IP on port 5480. In my case that would be https://10.24.0.33:5480. From there you can carry on.

The next window asks for the network information. You will not get past it without a system name and a DNS server, because both are mandatory fields. The fix: enter “localhost” as the system name and “127.0.0.1” as the DNS server. That way vCenter can resolve itself, alongside the entry in the hosts file.
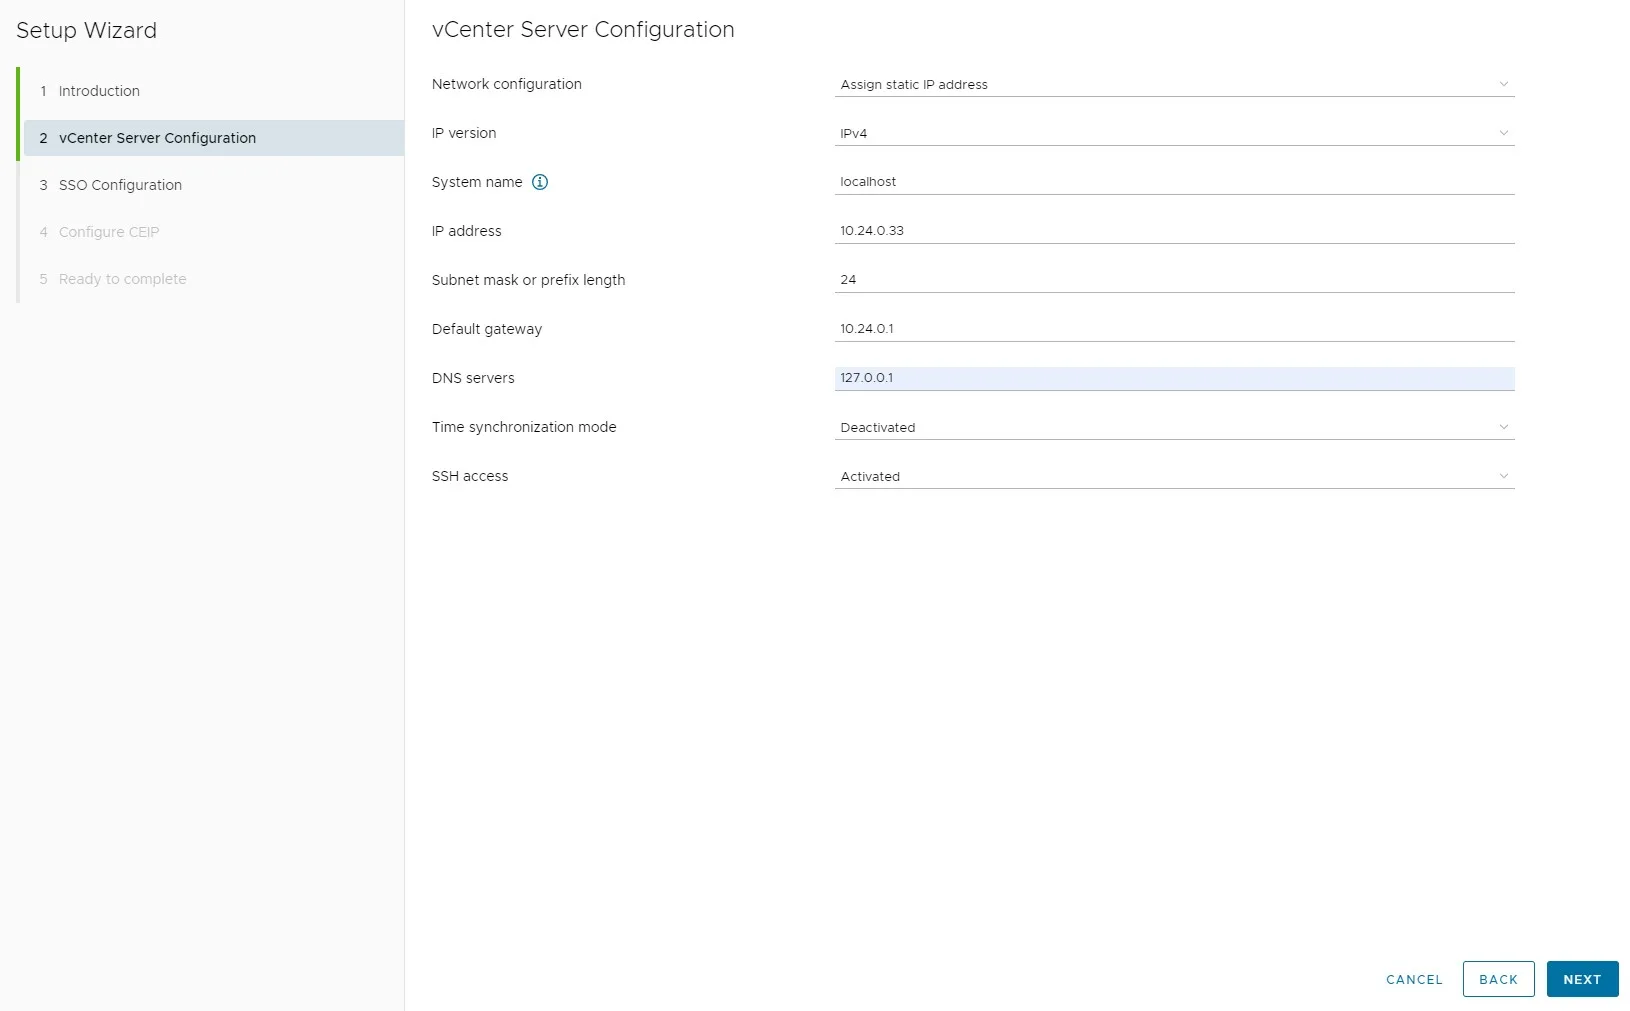
stage 2, vCenter installationAfter that the installation runs through and your vCenter is installed and started. You cannot add hosts by DNS name, of course, since everything has to go by IP. But if you later decide to run a DNS server after all, you add it in the VAMI (port 5480) and change vCenter’s hostname there.

How to install DNS in a homelab is described here.
You might also like

solution 1.00

Load Balancing (Avi)

Page to follow
post 0.73

Software-Defined WAN

expert 0.73

Marco Betschart